MANAGE A PAYEE
Managing a Payee allows you to store the Banking details for persons whom you wish to transfer funds to, making future payments easier to execute.
- Once logged into Go-Banking, click on the toggle aka ‘Hamburger’ icon
 to view your menu.
 - From your menu, select the following sub-menus:
 →
→  →
→ 
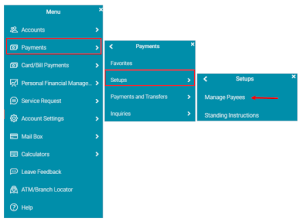
- From the ‘Manage Payee’ screen you can perform the following:
- View Existing Payees (these Payees can be edited or deleted)
- Add New Payees
- Setup ‘Multiple Transfers’ Payee
- Inquiry the Status of a Payment
- View upcoming Payments
NB: You can only manage the following Payees:
-
- Another GBTI Account
- A Domestic Account (account held at another Bank in Guyana)
- An International Account (Wire Transfer)
- Peer to Peer (Transfer to an internal account via email)
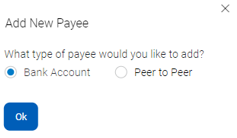
ADDING A PAYEE
- Once at your ‘Managed Payee’ screen, click on

- The box below will appear for you to choose the type of Payee you wish to add.Select Bank Account to add an Internal GBTI account, Domestic Transfer OR a Wire Transfer PayeeSelect Peer to Peer to add a Payee that can be paid by simply inputting their email address.
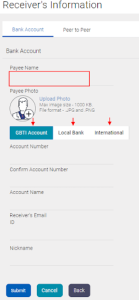
- Input your Payee Banking details and click

TRANSFERS
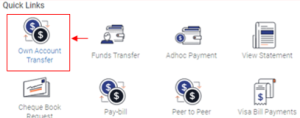
OWN ACCOUNT TRANSFERS
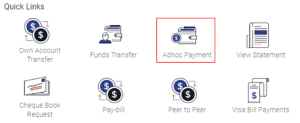
- Select ‘Own Account Transfer’ from your Quick Links widget.
- Select your Debiting and Crediting account, input the transfer amount, select transfer ‘NOW’ to execute the transfer instantly OR ‘LATER’ to schedule the transfer.

- Click Pay followed by Confirm.
INTERNAL (GBTI-GBTI) TRANSFERS
Ad Hoc Transfer to GBTI Account Steps
- Select ‘ADHOC PAYMENT’ from your Quick Links widget.
- Select the ‘GBTI ACCOUNT’ tab.
- Input transfer details, select your debit account and enter transfer amount.
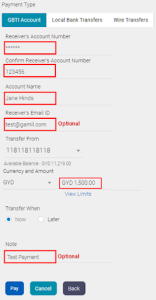
- Click PAY followed by CONFIRM.
Pay through MANAGED PAYEE Steps
By ‘Managing a Payee’, you are simply saving the GBTI transfer details to your profile for easy payments in the future. See Manage a Payee on how to add a GBTI Payee.
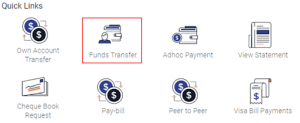
- From your Dashboard click the FUNDS TRANSFERS shortcut at your Quick links widget.
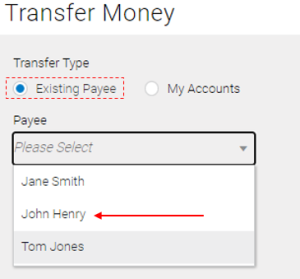
- Select, from your ‘Existing Payee’ list, the Payee you wish to transfer funds to.
- Once your Payee is selected, input your transaction amount and click PAY
If you have several accounts, click the dropdown at the ‘Transfer From’ field to change your debit account.
WIRE TRANSFER
Ad Hoc Wire Transfers Steps
- Select ‘ADHOC PAYMENT’ from your Quick Links.
- Select the ‘WIRE TRANFER’ tab.

- Input transfer details (email and notes are optional), select your debit account, transfer currency and enter transfer amount. (add payment details if necessary)
- Click PAY followed by CONFIRM.
Pay Through a Managed PAYEE STEPS:
By ‘Managing a Payee’, you are simply saving the Wire Transfer details to your profile for easy payments in the future. See Manage a Payee on how to add a Wire Transfer Payee.
- From your dashboard, click the FUNDS TRANSFER shortcut at your Quick Links.
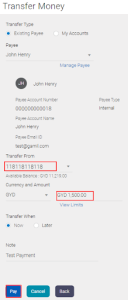
- Select from your ‘Existing Payee’ dropdown, your Wire Transfer Payee.
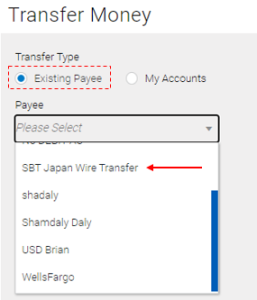
- Once the Payee is selected. A screen with that Payee details will appear. Select your debit account, select currecy, input transfer amount and enter payment details.
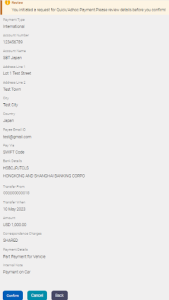
- Click
 to procced. A confirmation screen will appear subsequently, click Confirm to complete the transfer.
ELECTRONIC FUNDS TRANSFER (EFT) BRANCH ROUTING NUMBERS
Anna Regina – 3 0 0 0 5 0 0 6
Bartica – 5 0 0 1 4 0 0 6
Corriverton – 6 0 0 0 4 0 0 6
Diamond – 2 0 0 1 5 0 0 6
Lethem – 7 0 0 0 8 0 0 6
Parika – 1 0 0 0 6 0 0 6
Port Kaituma – 9 0 0 1 2 0 0 6
Port Mourant – 7 0 0 1 3 0 0 6
Providence – 5 0 0 0 9 0 0 6
Regent Street – 8 0 0 0 3 0 0 6
Vreed‐en‐Hoop – 9 0 0 0 7 0 0 6
Water Street – 2 0 0 0 1 0 0 6
Kingston – 1 0 0 1 1 0 0 6
PEER TO PEER
*Peer-to-Peer is NOT available to Corporate Accounts.
Peer-to-Peer (P2P) is a service offer by GO-Banking that directly connects parties to a transaction without the need of sharing banking details. The receiver of a P2P decides when to credit their account and to which account must the credit apply. It allows us to leverage our financial technology platform to bring this new innovative, convenient, safe and easy to use service to customers.
SENDING A PEER TO PEER
- Select ‘Peer to Peer’ from your Quick Links.

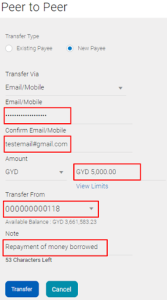
- Check the ‘Existing Payee’ OR ‘New Payee’ box
- Select ‘Existing Payee’ if you have already created a Payee for Peer to Peer transactions. See Manage A Payee on how to add a Peer to Peer Payee.
- Select ‘New Payee’ if this is the first time you are making this transfer or you are performing an ad hoc (one-off) payment.
- Input the transactions details and click Transfer.
- Click Confirm on the next screen to process your transaction.
- Note down your Security code. (The security code will need to be shared with your receiver)
CLAIMING A PEER TO PEER
- As the receiver of a Peer to Peer transfer you will receive a link to your email. Click the link to commence the claiming process.
- Once the link is clicked a screen will appear for you to enter the security code of the transaction. Input your four-digit security code. (The code would have been supplied to you by the sending)
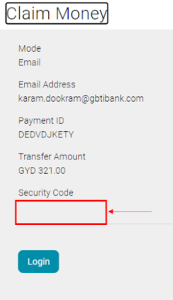
- Once you enter the correct code you will be direct to GO-Banking login page. Sign into the application.

- Once signed in, a screen will then appear displaying the transaction amount. Select how you would like to claim the funds. (This is done by selecting, from the dropdown list, your account you wish to credit
- Click submit to claim the transaction.
STANDING INSTRUCTIONS
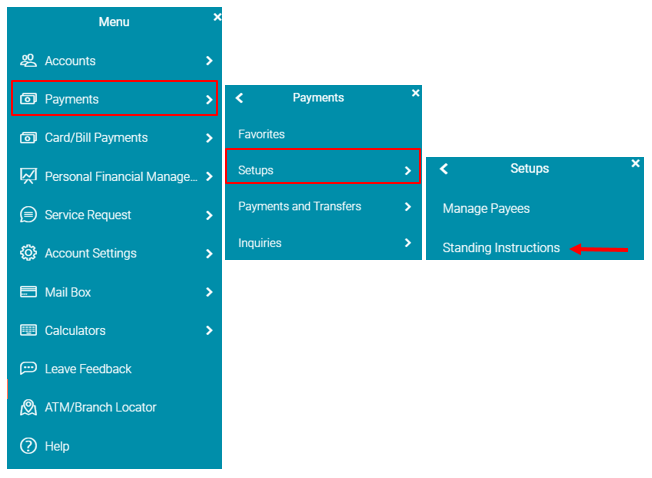
- Once logged into Go-Banking, click on the toggle aka ‘Hamburger’ icon
 to view your main menu.
 - From your main menu select the following sub-menus:
![]()
- A screen will appear for you to select one of two tabs:
- View Standing Instructions
- Setup Standing Instruction
NB: You can only setup Standing Instructions for the following transactions:
- Transfer between your own accounts
- Transfer to another GBTI account
- Wire Transfer
VIEW STANDING INSTRUCTIONS
- Once
 clicked, the following screen will appear.
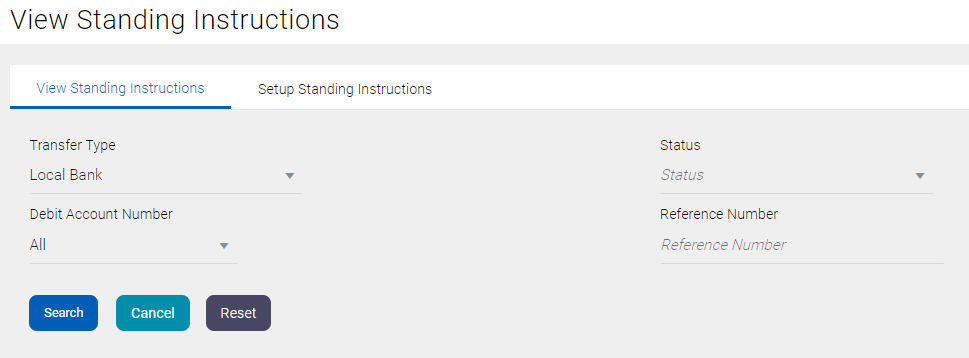
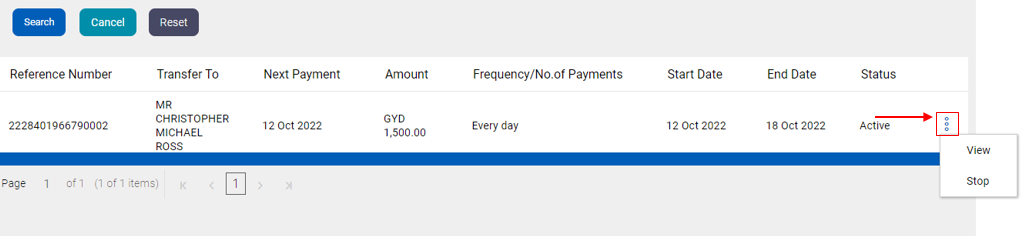
Figure III – View Standing Instruction.
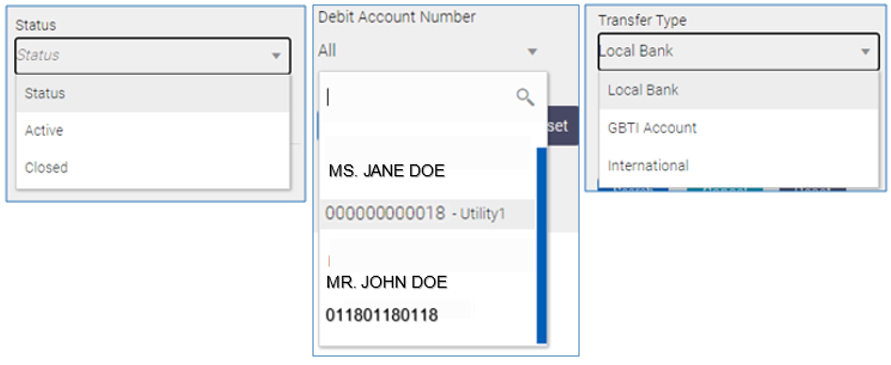
- In addition to searching for your Standing Instruction by a ‘Reference’ number, the following search criteria is available.
- Once you have searched for a Standing Instruction, the screen below will appear. Click on the eclipse/more option icon to view additional details of the Standing Instruction OR stop the instruction.
SETUP STANDING INSTRUCTIONS
- Select the ‘Setup Standing Instructions’ tab
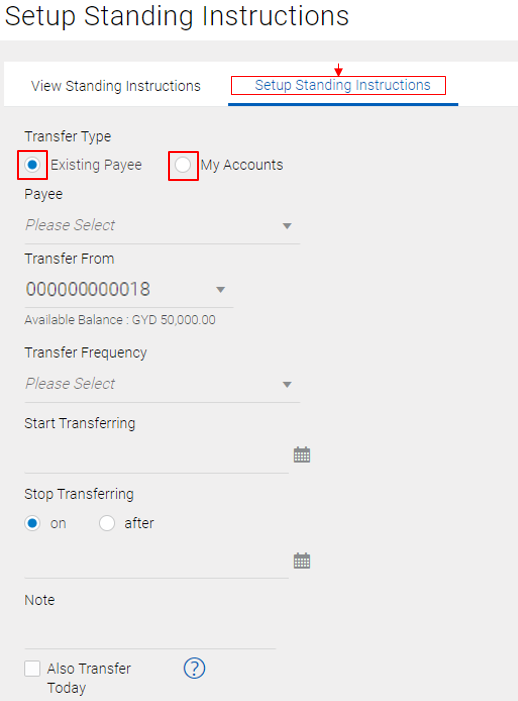
You can setup an OWN account transfer Standing instruction by choosing ![]() OR Setup a Standing instruction to a Payee already establish to your profile
OR Setup a Standing instruction to a Payee already establish to your profile ![]()
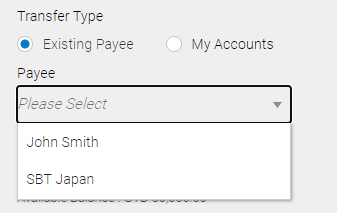
- If Existing Payee is selected, the dropdown list will display the Payees you’ve added to your profile. See Manage a Payee Guide for steps on how to add a Payee to your profile
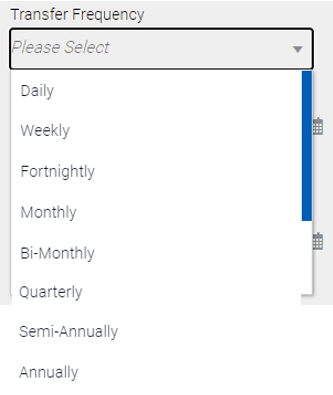
- The following Frequencies are available:
- Utilize your calendar icon
 to select your Standing instruction ‘Start’ and ‘End’ date:
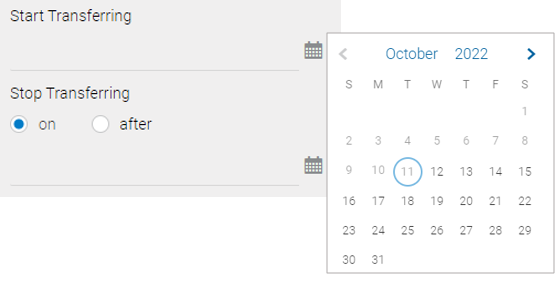
- Once all the fields are populated, click
 followed by clicking on
  the very next screen to complete the standing Instruction.
INTERNATIONAL WIRE TRANSFER
An International Wire Transfer is an Electronic Transfer of funds from your GBTI account to an account outside of Guyana. This secure payment method allows you to quickly transfer funds around the world. With GBTI Online (GO) Banking you can initiate your International transfers from the comfort of your home.
WHAT CURRENCIES CAN I SEND?
GBTI facilitates the remittance of the following currencies:
- USD – United States Dollar
- CAD – Canadian Dollar
- EUR – European Dollar
- GBP – British Pound
WHAT CURRENCIES CAN I RECEIVE?
Currency received will be converted to the currency of your account.
CAN I DEBIT MY FOREIGN ACCOUNT TO SEND A WIRE TRANSFER?
Yes. However, you can only debit your foreign account to send a Wire transfer of the same currency. I.e. Debit your USD account to send a USD Wire Transfer. Otherwise your Local (GYD) account can be used to send any currency.
WHAT ARE THE EXCHANGE RATES?
Exchange rates fluctuates throughout the day. Contact your nearest branch for today’s rate.
WHAT DOCUMENTATION IS NEEDED TO SEND/RECEIVE A WIRE TRANSFER?
You may be required to provide a proof of payment for Wire transfers received in excess of the expected deposit stated on your account. Your Branch will contact you in such cases.
You are required to provide an invoice or proof of payment for amounts remitted for USD$5,000 and over before the wire transfer is completed. Kindly upload document.
GBTI Corresponding Bank
- Bank of New York Mellon
NB: GBTI Swift code is GUTIGYGEXXX
SENDING WIRE TRANSFER
Wire transfers initiated from GO Banking using your local (GYD) account are reviewed by the Bank. Subsequent to receiving a confirmation on GO Banking when your transfer is submitted, you will notice that your account is yet to be debited. Once the Bank reviews and approve your request, an exchange rate is applied the transaction along with charges will be debited from your account.
If you are using your foreign account to remit the Wire transfer, no exchange rate is applied. Your account will be debited instantly, along with charges.
Use the Transaction Reference Number, shown on your confirmation screen, to track your transfer.
Documentation:
The Bank might require supporting documentation when sending Wire Transfers. This depends on the country of your beneficiary, transfer amount, purpose or simply a request from international Banks to confirm the validity of your transaction.
Charges:
Wire transfer charges are G$5,500. Charges are subject to change without notice.
WHAT DO I NEED TO SEND A WIRE TRANSFER?
Ask the Beneficiary to provide you with their complete banking details as shown below:
- Beneficiary Name: Receiver of the Transfer
- Beneficiary Address: Address of Receiver, including country
- Beneficiary Account Number: Account number of Receiver.
- Beneficiary Bank Name: Name of Bank that your Receiver has their account at
- Beneficiary Bank SWIFT code: International SWIFT code for the Bank where your Receiver account is held at.
- Intermediary Bank Name: Confirm with your receiver if their Bank has an Intermediary Bank. Not all transfers require an Intermediary Bank. These types of Banks are used when your Receiver’s Bank cannot handle the transfer ‘International’ and requires another Bank to act on its behalf.
- Intermediary Bank Address: Address, particularly country of Intermediary Bank.
- Intermediary Bank SWIFT Code: International SWIFT code
- Purpose: Reason for sending money to your Receiver.
OPTIONS FOR SENDING WIRE TRANSFER?
Visit your nearest GBTI branch to send a Wire Transfer.
OR if you have GO Banking initiate a Wire Transfer from the comfort of your home. See ‘Wire Transfer Guide’ for more steps.
OR if you have GO Banking initiate a Wire Transfer from the comfort of your home. See ‘Wire Transfer Guide’ for more steps.
WHAT COUNTRIES CAN I SEND WIRE TRANSFERS TO?
Wire transfers are restricted to and from the following countries:
- Belarus
- Crimea
- Cuba
- Democratic People’s Republic of Korea
- Donetsk People’s Republic
- Iran
- Lugansk People’s Republic
- Myanmar
- Russian Federation
- South Sudan
- Syria
- Venezuela
WHAT CURRENCIES OF WIRE TRANSFER CAN I RECEIVE?
Funds can be remitted in USD, GBP, CAD and EUR. However, all funds received will be converted to the currency of your account.
HOW SOON CAN I HAVE ACCESS TO THE FUNDS WHEN SOMEONE HAS SENT A WIRE TRANSFER?
Within 1 to 3 business days.
WHAT EXCHANGE RATE IS USED?
Your account will be credited at the prevailing exchange rate for the currency received.
ARE CHARGES APPLIED FOR RECEIVING WIRE TRANSFERS?
Charges of G$1,500 to G$5,000. will be applied based on the amount received.